You cannot manipulate your attendance records in the Eattendance system. The system is designed to be accurate and secure, and employees are not able to change their attendance data.
The system uses biometric devices, web browsers, or mobile apps to record attendance, and the time is recorded based on the device ' s time settings or the employee ' s assigned time zone.
To start using the payroll system, you need to contact us and provide your company details. Once your company is registered, you will receive an email with login details. You can then access the system and start managing your payroll.
To create a new user, follow these steps:
- Navigate to Personal Details Menu:
- Access the Personal Details menu within the system.
- Click Add New Employee:
- Select the option to add a new employee profile.
- Enter Employee Details:
- Fill in the required fields with the employee's personal information, contact details, and other relevant data.
- Save Changes:
- After entering all necessary details, click "Save" to create a new user profile.
If you've forgotten your password, don't worry! Follow these simple steps to reset it:
- Visit the Login Page:
- Navigate to the login page of our system.
- Click "Forgot Password":
- Locate and click on the "Forgot Password" button on the login page.
- Enter Your Email Address:
- In the provided field, enter the email address associated with your account.
- Click "Submit":
- Once your email address is entered, click on the "Submit" button.
- Follow Further Instructions:
- Check your email inbox for further instructions on resetting your password.
- Follow the provided link or instructions to reset your password securely.
By following these steps, you'll be able to reset your password and regain access to your account without any hassle.

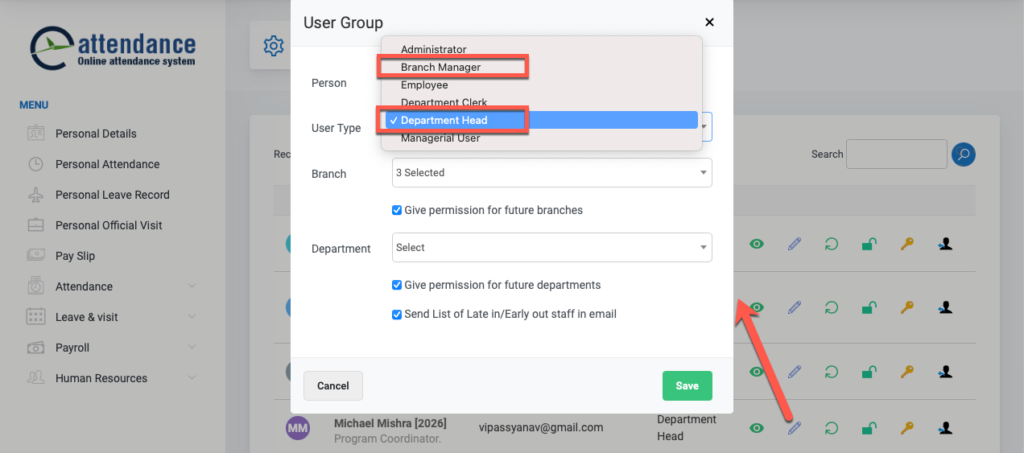
To make a user administrator, follow these steps:
- Navigate to General Settings > User Permission:
- Access the General Settings menu, then select "User Permission."
- Select User:
- Search for the user you want to change the role of, and click on pencil icon to edit the "User group".
- Change User Type and Save:
- Change user type to "Administrator" and make other necessary adjustments, save the changes to update the user's status.
By following these steps, you can easily change user's role as needed, ensuring efficient management of user accounts within the system.

- Go to Leave & Visit/ Leave Summary.
- Select Year and Leave Name (Choose only one leave. Transfer button will appear if only one leave is chosen.).
- View the report.
- Click on transfer icon (Transfer button will be visible only if preceding attendance year is set.).

5. On pop up, click 'Transfer Leave Balance'.
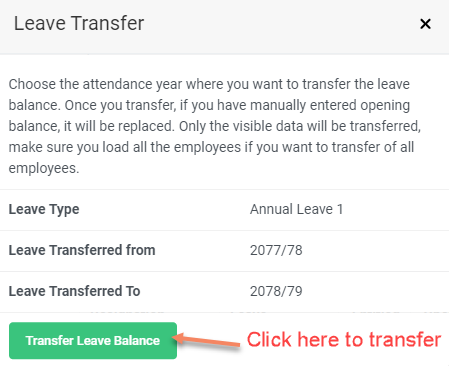
6. Go to Posting/Opening Leave.
7. View the transferred leave.
Note: If you re-transfer again, the transferred leave balance will be updated.
Email address is compulsory in order to save Personal Details of an employee. It cannot be saved if the mandatory fields are not filled up. Some users might not have an email address. In that case, you can keep the email address as employeename@eattendance.com. For e.g.: john@eattendance.com.

Department Head or Branch Manager is benefited with separate login authorized to view all the reports of his/her concerned department or branch only. For this login, the admin needs to give rights to concerned person from Users of Setup menu. Then, the system automatically defines the rights of concerned person. Also, the admin can define more permissions.
Department Head/Branch Manager login and Admin login are separate logins. The difference is that admin manages the whole system. Whereas Department Head/Branch Manager has access to manage concerned department or Branch only. If a single ID is assigned with both, admin login would be better. For all the reports, there is an option to choose the department and branch which facilitate to view the required report only.
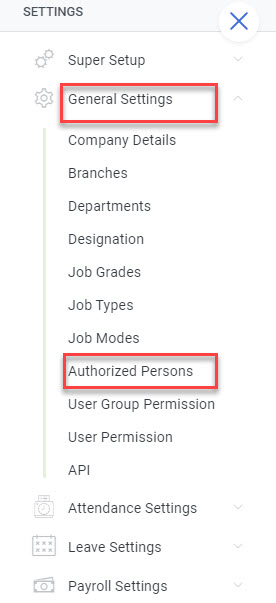
- Navigate to General Settings > Authorized Persons:
- Access the General Settings menu, then select "Authorized Persons."
- Select Branch, department other parameters:
- Choose the relevant branch, department and other parameters for which you want to designate authorized persons.
- Check Desired Checkbox:
- In the list of individuals displayed, click on the checkbox next to the names of those you wish to designate as leave approvers or leave recommenders.
- Save Changes:
- After selecting the desired checkboxes, click "Save" to confirm the designations.
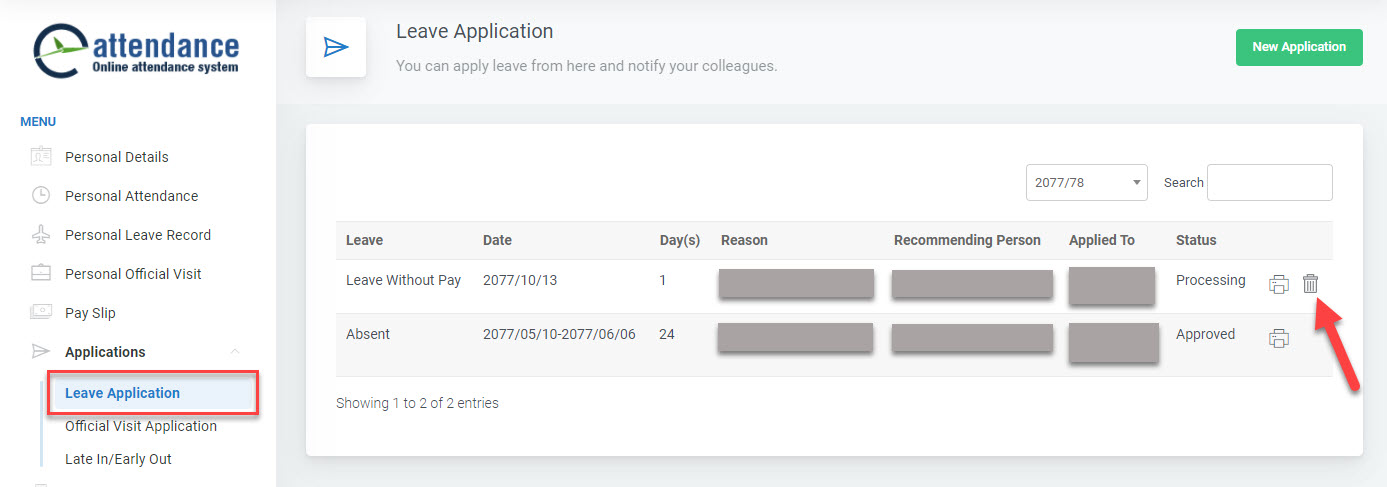
- Navigate to Application > Leave Application:
- Click on the "Application" option in the main menu, then select "Leave Application" from the submenu.
- Delete application:
- Until the leave is approved, the employee can also delete the leave from Leave Application menu. If the leave is already approved, only admin is authorized to edit or delete the leave which has been posted by mistake.
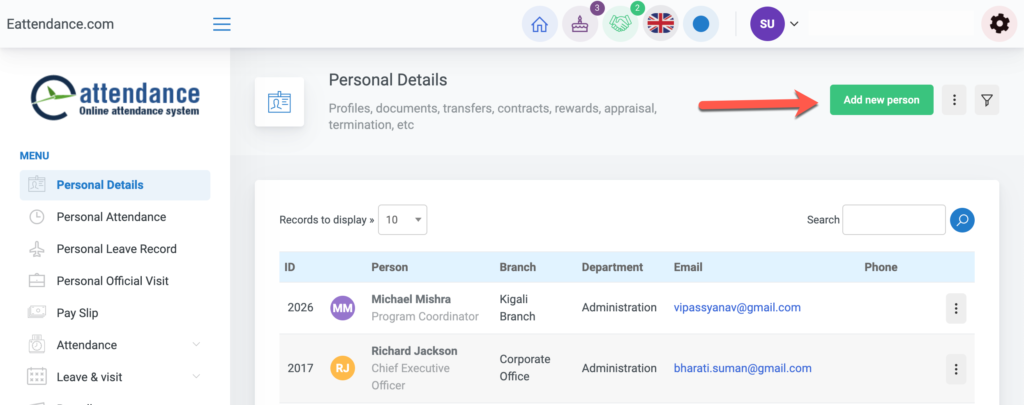
To delete an employee profile, follow these steps:
- Navigate to Personal Details Menu:
- Access the Personal Details menu within the system.
- Identify Employee to Delete:
- Locate the employee profile you wish to delete from the list.
- Click Delete:
- Select the option to delete the employee profile.
- Confirm Deletion:
- Confirm the deletion when prompted.
By following these steps, you can remove unwanted employee profiles from the system, ensuring that only relevant and up-to-date information is maintained for each employee.
The system works in a process. Once the employee shows card or punch finger in the device, the attendance goes to local database server. Then, local database server sends attendance logs to web server by internet. In this way, the attendance is seen in software. This process generally takes 10 minutes to import the data from device to software. So, the user might be confused with the absent report though they had done attendance in device.
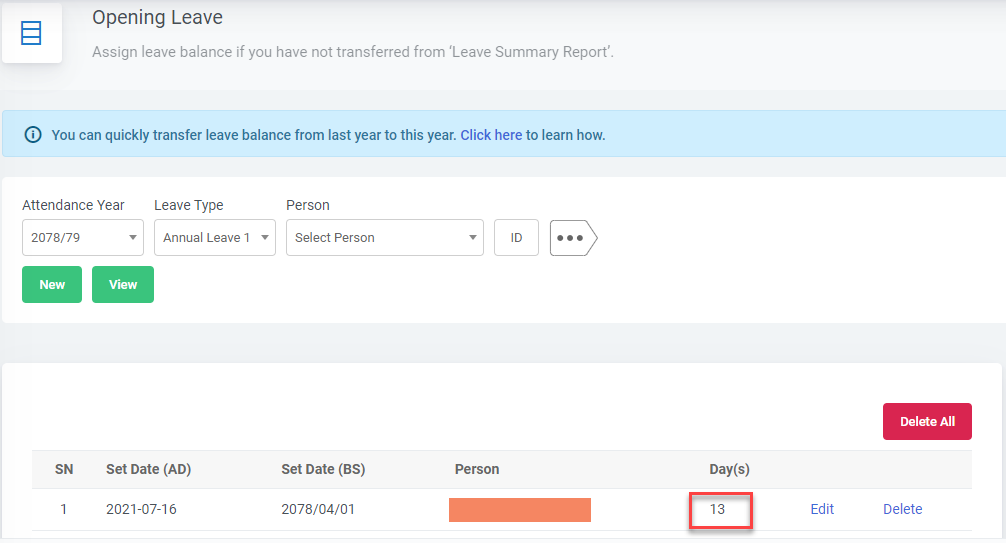
The admin must maintain Entitled Leave and Opening Leave (Leave & Visit > Entitled leave, Opening leave) for all of the employees. Otherwise, the system won’t allow the user to apply leave if you have set to check leave balance when applying leave. Similarly, if the employee has no leave balance, the system won’t again let to apply leave. The one who is applying for the leave must be sure for the entitled leave or remaining leave that can be applied. The employees can can know his/her leave balance from Leave Record.
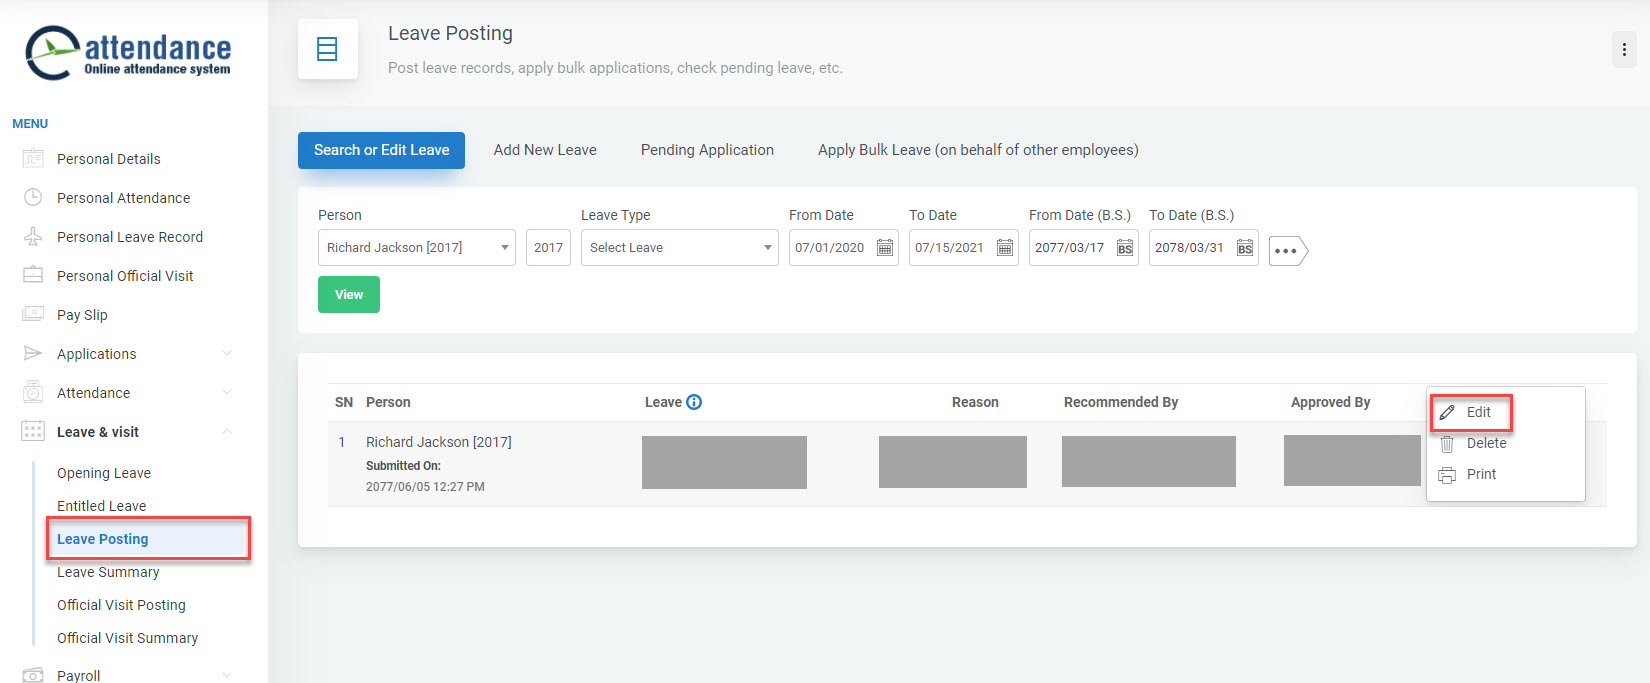
If you are a user, you cannot change the date of approved leave. But, if you are an admin, then you can change it. The method to do is:
- Go to Leave & Visit> Leave posting > Search or Edit Leave
- Select the Conditions > then, click on View
- After then, the user can change the desired date
Generally, this message come when the device transaction memory is full. In this case, you need to clear the log of attendance. Before deleting the att log in device, you must be sure whether the complete data has been imported to the software or not. Once you are confirmed, then, you can delete the attendance log.
Steps to do:
Go to Super Setup > System Options > Adv options > Del Attlogs
This happens when some error has come in the system or during our updates. If it is not corrected automatically within sometime, please contact our support team.
No, it is not possible to hide this information from the reports. The system records who made edits and includes this data in the reports.
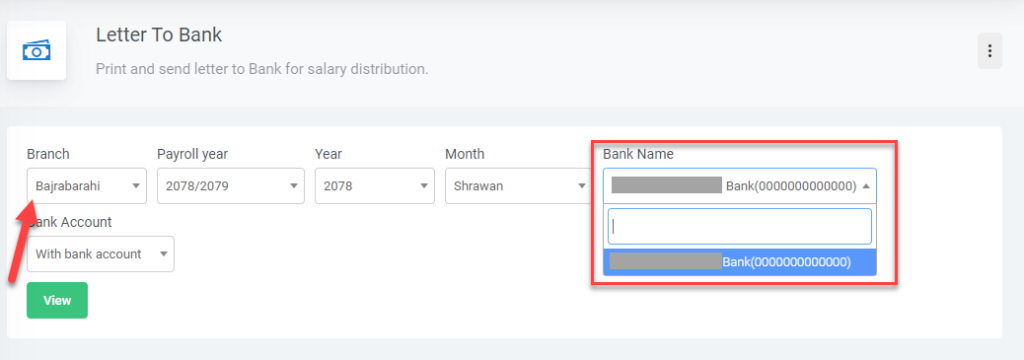
- Navigate to Payroll > Letter to Bank:
-
- Locate and select the Letter to Bank option within the Payroll menu.
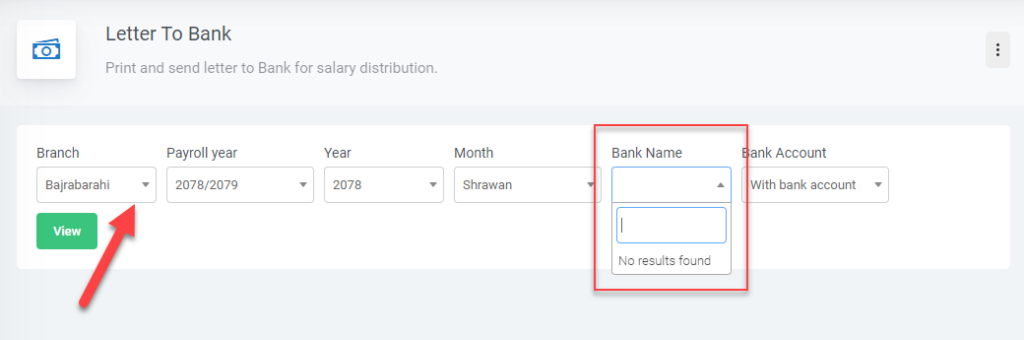
Then follow these steps:
2. Go to Payroll Settings > Bank Accounts:
-
- List of Bank account will be shown.
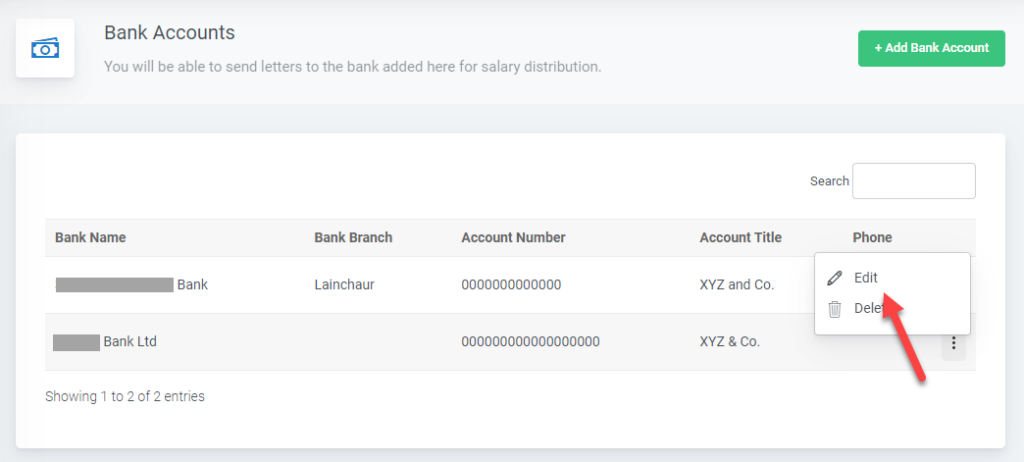
- Select bank from the list and click Edit to open a edit form.
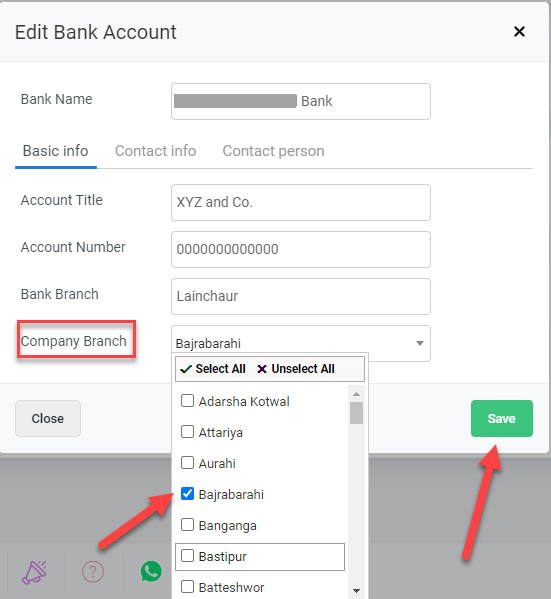
- Select the Company Branch you want.
- Click Save.
Now, bank will be shown in selected branch.